Open Door

Open Door
Indianapolis, Indiana

Friday, September 27, 2013

It’s the Little Things – Cats


One of the things that has greatly surprised me about this project is how many little things there are to be dealt with. Some of them are everyday problems that would crop up for anyone who purchased the property and some are unique to our situation. Either way, there are a significant number of things to do that are just plain time consuming. One of these is a problem with stray cats.

There are a number of strays that I think have been living on the HH property. We see them around frequently and one of the neighbors had mentioned that there were some living in the garage. And while the garage is no longer standing and that eliminates one hiding place, we still have a number of cats that call the HH home.


For many people this would be a nuisance, but for us it’s a danger. My father is highly allergic to cats and even a scratch could be enough to cause the worst of reactions. So, what do we do about the cats? That has not been an easy question to answer.

I spent quite a bit of time on the phone with IndiFeral asking if they have any program for this. Their program involves you catching them, spaying or neutering, re-releasing them, and seeing to their shots, etc. Umm, that’s not going to work. I don’t want to make the place into a kitty resort, but a kitty free zone. I even offered to pay for the spays or neuters, but they can’t remove the cats.

After talking to the Humane Society of Marion County and running through all of the suggestions/people that they had given me the only “answer” we could come up with is not one that makes me at all happy. We can trap the cats and call animal control, and we can try and repel them, but that’s really it. At this point I’ve hit a dead end. We don’t really want to hurt these animals, but it’s imperative that we remove them from the property. If anyone out there has a better idea or resource, I would love to know what it is.

-Amanda

Wednesday, September 25, 2013

The Garage, Before

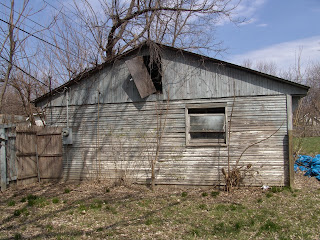
I was going through an old file of pictures the other day and realized that while we blogged about the destruction of the garage and posted pictures of the wreck we've never posted any pictures of what it looked like before. So, here's the garage in the past days:

Front of the the garage.

 
Interior. Notice the pile of trash in the corner.

Interior. This is one of the barrels that held.... flowerpots!
 
North side. There's corrugated metal over the old wood boards.
 
South side. From here it's a bit more obvious that this end of the garage is in bad condition.
 
Rafters. This one shows the old termite damage and how unstable this end of the garage had become.
 
 
There was one item in the garage that we had placed there. One of the radiators from inside the house had fallen down and out of the upstairs of the West Wing:
 
 
In the upper left corner of the opening the radiator can be seen peeking out.
 
This is the upstairs hallway looking out into the west wing. The radiator can been seen sitting next to the fridge. The fridge came down too, but was stolen by scrappers before we were able to purchase the property.
 
One last picture taken from the upstairs doorway.
 
That's it for tonight!
 
-Amanda 


Thursday, September 19, 2013

Taking Back Toad Hall


If you’ve driven by the house in the last few years you have probably noticed the lovely graffiti on the North face of the tower. Ever since we seriously began discussing purchasing this property I have wanted to get this cleaned up. So why haven’t we?


There are two main reasons. The first problem is that most of the cleaners that we would use for this need to be rinsed off, so we had to wait until we had the water on in the Bungalow. Now we just need to take a long enough hose over there and this problem is solved.

The second problem is what do we use? On the surface this seems easy enough. Go to the hardware store and purchase some paint remover. But it’s not that simple. With a historic home it never is! Since the brick is so old, the composition is very different from new brick. It’s much softer and will absorb most chemicals and then break apart. So, I checked the preservation briefs to see if they had any recommendation, but other than what not to use, I didn’t find an answer. This is something that I have asked a number of “experts” over the last couple of years and no one knew what to do. A couple of weeks ago I posed this same question to our new contractor. Greg gave me the number of a company in Fishers and they have an expert on staff that told us exactly which product is the one to use. :D

Now we just have to order the product and pay the $85.00 it costs for one can of it. Fortunately the can will cover 100 square feet so we will have plenty left over. I’ll take many pictures when the removal day comes so that you all can rejoice with me!

-Amanda


Friday, September 13, 2013

Toad's Garage

A little over a week ago my Grandma was walking to the store and fell on her way home. A trip to the ER cleared her, but two days later another trip to the ER showed that she has four very badly broken ribs. This has complicated life a bit since she is at risk for falls as long as she is taking pain medicine and she has to take it so that she can breathe deeply and not get pneumonia. It’s mostly been three of us staying with her and most nights are mine.

So last Friday morning (September 6th) found me at her apartment waiting for Eric to pick me up so I could go to the office. Just before Eric pulled in to the apartment complex he got a call from a neighbor telling him that the garage at Toad Hall was on fire and they had already called 911.

We headed straight over to the house and could see a large cloud of smoke before anything else. There was a police officer parked in front and a bunch of fire trucks blocking Brookville Road. There were several ladies standing in the driveway who live in our neighborhood and who had also called in the emergency. (I am sorry to say that I was so distracted that I do not remember their names or where they live. If you know who this is please let us know so that we can thank them properly!) IFD already had the blaze well under control but the garage was partly collapsed and a total loss.

We were there for several hours that day and my Dad stayed all day to make sure that no hot spots reignited. The arson investigator and detective spent quite a while looking things over and talking with us. They were incredibly kind and offered what help they could.

Unfortunately the garage was not structurally sound and had been condemned so no insurance company would insure it until it was restored to good condition. We had plans to do so, but were focusing on the Bungalow and stabilizing the Horner House first. 

 September 6th just after IFD left.

This is after Eric and Dad pulled down most of the remaining structure as it was ready to fall at any moment.
 

Earlier this week I called IPL to find out what the cost would be to repair the security light and for the other repairs they had to complete on the power lines that run directly behind the garage. We were very thankful to find out that the repairs to the security light are covered in our monthly fee and the other repairs will not be billed to us. It was arson, but I was still happy to hear that we would not have to absorb this additional cost.

 This is the power pole and security light behind the garage.


AT&T also has been out. They have to cut some trees to get to the main line and repair the line that runs to the Bungalow. Unless they worked from the property behind us I didn’t see where this had been completed yet. But I was not there when they stopped by and may have missed seeing the repair.
 
 It’s not obvious, but right in the center of the picture you can see the charred phone line that runs to the Bungalow.


One of the questions that we were continuously asked by IFD and the investigators was what was in the garage. We had stowed one of the radiators from the house in the garage way back before we even purchased the property. It had been hanging from the second floor in the back and finally fell out where it could be reached. So, we moved it to the garage where the scavengers wouldn’t find it. Otherwise the garage was full of junk. Trash bags and barrels and other junk and we didn’t want to know what it was! Our plan was to eventually rent a dumpster and empty the place, but not before fixing the rafters.

After Eric and Dad had collapsed the other end of the garage they very bravely opened the barrels to see what was in there. Flower pots.


While the last two weeks have been difficult, they could have been significantly worse. The fire was caught early and didn’t spread to any other buildings including the neighbor’s houses, the Bungalow, or Toad Hall. The contractor has agreed to clean up the site and for around the same cost Dad had estimated for us to do the work ourselves. No one, including the responders, was hurt. There are many more reasons to be thankful.

This last picture is from just outside the steps of the Bungalow. There is a figurine on the concrete that speaks for me. Bad things may have happened in the last weeks, but

“LOVE GROWS HERE”!


-Amanda

Tuesday, September 10, 2013

Old Home Bathroom Remodel - Part 2

When we stopped last week, the last of the demolition was finished. And when we finally got the last of the plywood up, we were finally able to assess what needed to be done. Some of the framing in the back wall needed reinforcement and then we closed the window hole and added some insulation.


Area where window had been.


Back of house prior to the window area being finished.

Then we had to fix the water damage to the sub floor.

New sub-floor installed.

Finally, we were able to begin putting the room back together!


Tub installed.


Surround installed.


Caulking, caulking caulking.

I didn’t get a final good picture of our work, but I have never been happy with the colors. I will get a new picture when we put the house up for sale.

Finished except for the light - see wire hanging over sink.

What’s the moral of this story? When starting a project in an old house, leave plenty of time and money for the surprises that you will find!
Next blog on Thursday.

-Amanda

Thursday, September 5, 2013

Old Home Bathroom Remodel


The following is a blog in 2 parts.  We’re posting the first part tonight & will continue next week.

From the first day of our blog, part of our goal has been to show what problems we have encountered and our failures and successes in dealing with those problems, so that hopefully others can avoid some of our mistakes. To that end, we have posted about other homes and projects and will continue to do so. In the coming weeks, we will be focusing most of our resources on the Bungalow and our current residence in Beech Grove. That is as soon as the Bungalow is finished enough that we can move in and the Beech Grove House is repaired from a hail storm and ready to go on the market. Neither of these houses is as spectacular as the Horner House, nor do they qualify as “historic” except in the most basic way; they are both over 50 years old. Having said that, there are more people out there that live in and deal with the challenges of an old house than there are those who live in historic homes. So over these next weeks, we will be posting more about these houses and some of our (many!) challenges with them.

The Beech Grove house is your basic post WWII boom home. It’s a story and a half with a full basement and only one bathroom. There are two bedrooms on the ground floor and the upstairs is one very large bedroom with a walk in closet. (You can step in and walk to the back as long as you’re less than 4 foot tall.) The front door opens into a nice sized living room and there is a tiny eat-in kitchen.

 We have done quite a bit of work on the house in the time that we have been there. One of our most interesting projects was fixing the bathroom. From the time we first moved into this house we wanted to redo the bathroom, but there were always more important projects. That was until three years ago. The floor near the toilet had gotten a bit soft and while there was no other evidence of a leak, we knew that it needed dealt with. But worse than that was the shower; more precisely, the original wood window that was in the shower.

We had kept the window covered with plastic to keep the water out of it, but the damage had been done long before we ever moved in and it was time to take care of it. The bathroom is fairly small and it had a built in closet to the right just inside the door. Then a pedestal sink, the toilet, and the tub and shower across the back. At some point work had been done in the bathroom and a solid shower surround used. They cut a hole in it for the window and used bathroom grade trim around the window. Sadly, I didn’t get any pictures before we started.
 
            This picture is after we ripped out the surround and had removed the paneling that was on the walls.

              As can be clearly seen, there was significant water damage around the window.


When we had gotten to this point, not only did we find a bathroom that looked like it had been decorated by Jackson Pollock, but we also found that quite a bit of the original gypsum wallboard remained. (We had expected drywall!) Just an FYI: Be really careful when you are doing demolition in a sixty year old house. When you using a 5lb sledge on the gypsum wall board remember that there may be plaster on the other side that you do NOT want to remove. Or crack. There are no pictures of my handiwork, but I only managed to crack plaster in the hallway in two places before Eric pointed out the error of my ways. Moving on…
The other really interesting thing was that the tub had been replaced at some point. And it was just a bit longer than had been expected. In the following pictures you can see where the wall board had been removed to accommodate this larger tub.


It takes a lot more work to break up the old gypsum board than it takes to destroy drywall. And the stuff is really heavy too. We literally had to shovel the place out.


After getting the wall board off, the built in closet torn out, and most of the plywood off the floor we were finally ready to begin the real work.


The plywood on the right side was badly water damaged, much more than we had expected to find. The plywood on the left was screwed into place with so many screws that it took several hours just to get this one piece up.

And this was the end of the demolition. Stay tuned for next week’s repairs and rebuild!

Next blog on Tuesday.

-Amanda