Open Door

Open Door
Indianapolis, Indiana

Thursday, October 31, 2013

A Halloween Story


Many months ago, back when we were in the process of removing the board from the main entrance of Toad Hall, we had the opportunity to meet a number of our neighbors to be. Most of them kindly welcomed us to the neighborhood and many wished us luck on our undertaking, but there was one man that seemed to want nothing more than to scare us away. I’m not sure if he actually believed the story he told, but he was very insistent it was true. So for Halloween, with a few enhancements, we will relay that story here:


“Many years ago this house was not just a house. The owners were undertakers and not only lived here, ran the family business from here as well. The parlor was used to display the bodies and hold the funerals and the third floor was where all of the caskets and supplies were kept.

After a time the business went under and the undertaker died leaving the house empty and abandoned. No one wanted to live in a mortuary so many years passed and the house fell to ruin. After a time, most people in the neighborhood moved on and no one really remembered what the history of the house was, but by that time it was beyond saving. The neighborhood kids were the only ones that dared enter and that was only to prove their bravery, while the fearful ones ran.

A number of years ago a young man of high school age disappeared. His father was a widower and devastated by the loss of the boy. He kept at the police until finally, the boy was found. In this very house. He was on the third floor in one of the remaining caskets. Murdered. I watched them remove his body from this house, myself, still in that very casket…”

Again, I’m not sure what the intent of this story was, but the man that told it did not know the real history of the house. It was never used as a mortuary. The house had been broken up into apartments at the time this was supposed to have taken place. And the only access to the third floor is through a small hole in the second floor hallway. There are no stairs and it’s definitely not big enough for a casket. According to the gentleman, though, the caskets were raised and lowered through the tower windows. Not having seen any evidence of such a pulley system, inside the tower or out, we do not believe that this story is true.


The only access to the third floor.


If, however, there is any truth to the legend, we believe that tonight, on All Hallows eve, when the veil between worlds is at its thinnest, now would be the time that evidence might appear. So when you drive by the house tonight, look to the tower to see if you can find any sign of the lost souls who spent their last time above ground, here in Toad Hall…

Wednesday, October 30, 2013

Knightstown Architecture - Commercial Buildings - Page 1


Welcome to Heritage Funeral Care. It's a lovely old Italianate stye home that is now being commercially used as a Funeral Home. Happy Halloween!


As you can see in this picture, the building has been added on to a couple of times. While these additions and the new use are not my preference, it's wonderful to see it preserved and purposed, rather than demolished.


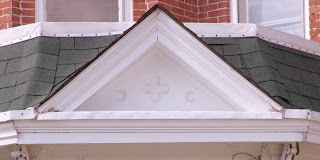
The porch doesn't have a lot of detail but there is a nice carved accent in this peak It's a bit hard to see in the picture, but in person it's much more obvious.


The frieze board has a beautiful vine pattern that has been painted in with green. The corbels also have been accented in green. From the ground all of this decoration just pops out at you and really makes the building interesting.


The brick arch with stone keystone and springers (the end stones) add interest and keep this window from being plain.  


One very unique feature of this building is the angled entrance and raised roof. I love how they even added a painted "keystone" in green above the upped window to tie it all together.


From this angle you can see the very unusual shape of the roof that covers the entrance and upper windows. It also shows on of the many additional windows that randomly spaced in the attic area of this home.


And last, seeing as how this is a Funeral Home and tomorrow is Halloween, Eric had some fun. :)

 Happy Halloween!

Tuesday, October 29, 2013

It’s the Little Things – Mail


Way back when we first bough the house one of our very first tasks was to have the security system installed. When that was done we set it up so that the bills would be mailed to the Bungalow, in part, so that I could get the mail running. A couple of weeks later the alarm company called to say that the bill had been returned to them. They offer to help out and began both emailing and USPS mailing the bills to us.


This is the mailbox that was there when we got the house. It is on the North side of the house (away from the road) and partially hidden by the bush.

 
I also took the time one day to run by the local post office. One of my Aunt’s works for them and had suggested that I try and talk to the person on my route or the branch manager. I did speak to the manager and she told me that the mail box needed to be on the front of the house and in an obvious location. So we picked up a new mailbox and Dad mounted it near the front door.


This is the new mail box that Dad mounted on the front of the house. It's large enough to hold both our personal and business mail. 

Unfortunately, this still didn’t help and our mail has been getting returned. The best answer now would be to stay around one day and catch our local mailman while they are on the route. I haven’t made the time to do this yet because now we can’t get into the mailbox. Someone tried to break in to it and stripped the lock. This needs to be fixed before I start mailing us things to see if they will be delivered. It’s just another little thing that we will get to. Eventually. :D

-Amanda

Monday, October 28, 2013

Knightstown Architecture - Houses - Page 3


Take a look at this Italianate beauty. The use of arches in the porch and windows really adds character to this place. Unfortunately, the tree makes it difficult to get a really good picture of this stately residence.


It's really fun to see how the vents were fancied up and turned into decorative elements. The star pattern shown here works perfectly with the rest of the architectural details.


These lovely doors with their leaded glass add elegance to an already beautiful entrance.


The corbels are very intricate. This is some serious scroll saw work. As a side note, these corbels are probably much larger than you would expect. We were shocked when we found a couple of the original corbels inside the tower room of Toad Hall. They are big, and heavy!


Bay windows are a great addition to any room. And here, it's also a balcony. The corbels on this section are different than the ones on the eaves. 


The iron fence is set on top of a rock wall and has very fancy corners. It's a fine detail added to an already lovely property.

Thursday, October 24, 2013

Bungalow – Kitchen Revamp


We worked on the Bungalow again this weekend and did get a lot accomplished. Since what I know about electricity would take less time to tell than flipping on a light, I will be brief. Eric and Dad removed the florescent light that was in the kitchen. Dad said that it was of a very bad design it was a fire hazard. So, the light went quickly leaving a hole in the ceiling that will have to be dealt with, but it exposed another issue. There were some old wires hiding up in the ceiling that had to be traced to their source to make sure that they were no longer hooked to anything; and, I’m happy to say, they weren’t. We also rewired the other kitchen light and ran plug sockets for both my refrigerator and freezer. There’s still electrical work to do, but this was a nice step towards a working kitchen.

As for the rest of the kitchen, all but one part of the demolition was already complete. There is one wall that was still covered in tiles. Tristan had spent quite a bit of time trying to remove them and only succeeded in removing the little bit you see missing along the bottom of the wall. The tiles were very firmly adhered with a large quantity of some sort of silicone glue and were shattering, but still not coming off the wall. So, after a quick bit of research on the internet, I came across one alternative suggestion for removing kitchen tiles. Cut out the wall board they are glued to and put in a new wall. Here’s the result:

 Here you can see that two tiles are missing. That took almost twenty minutes with two people working on it. You can also see where the tiles were chipped away along a seam in the board they were stuck to. 

Once they started pulling the nails just popped free!

Behind that board was the original plaster wall! With some very old yellow paint and even a bit of wallpaper.

The two smaller boards in front were the upper section. Eric was able to rip these off without help. The only tile left on the wall is along the baseboard area and they have a plan for removing that quickly too. The demolition is complete!

What would have been several hours of work came out in fifteen minutes. The biggest issue was that the single piece that was left was too heavy to carry out. So they had to cut it half. And before it was taken out, Eric stepped on one of the nails. Ouch! He’s up on his tetanus vaccine and feeling much better already. It was a productive weekend and I hope to get even more done in the coming days.

-Amanda

Wednesday, October 23, 2013

Knightstown Architecture – Houses – Page 2


Beautiful big old Victorian with many great details. The brick steps make a nice contrast to the stark white porch.


Another angle that shows the wrap around porch with the side entrance.


 The shingles on the peak of the porch and the gingerbread are part of what give this house such great character. This small area alone has three different patterns of turned wood pieces.


Check out the decoration on these windows. And where but on a painted lady do you see four colors of paint on a window? It shouldn't work together, but it really does.


In the second picture the light is reflecting off of this window so that you really don't notice just how interesting it really is. The decoration and roof line over the top of the window are very interesting and unique.


Every elevation of this house just gets more interesting. Vertical paint lines, a bumped out window, shingles, corbels, and two peaks make it hard to know what to look at first.


This picture is a bit grainy, but it does show the detail and paint colors on this corbel.

 
 The chimney even has two colors to add interest to the already complex elements.


A closeup of the decorative panel in the chimney. A good way to cap off the complexity of this great house.

Tuesday, October 22, 2013

The Bungalow Structural Resolution – Part 4


The next day we jumped right in and got the other everything finished up. The first thing we did was to attach two boards flat side up to the floor joists parallel to the old “beam” that was under the original back wall of the house. In the same was we added the shorter board at the front of the basement this is to add stability to that “beam” and help distribute the load.  


I couldn't get one picture of the added board, so here are two.


After that we put together two of the jacks to use as temporary supports while were raising the new beams into place. By this time my brother, Jim, had arrived and we were all VERY thankful for his help. That beam is heavy!!!


The bricks are in place and the beam and post are waiting to go up. We added the bricks so that the wood posts would not absorb any water from the floor, which will extend their life and prevent a possible mold problem.


The green post was put in under the original "beam" when the house was moved. Here Dad and Eric had put the post in place and were deciding how to stabilize the post while getting the beam up. With the house now resting on it, it's going nowhere, but it was a process.


The two center jacks were used to help keep the beam raised while attaching it to the posts and to make sure that the beam was up against the floor joists. We also kept these in place while nailing the beam to said joists.

Beam is in place and good for a long time. Now we need to clean up the mess.

With Jim’s help the construction of the second beam went much more quickly. And, the raising and installing of it went more quickly as it was the second one we did. It also helped that we used a jack under one end. Also, the placement of this beam was important. It ends under the old “beam” that held up the back wall giving additional stability and strength to that “beam” as well.

Second beam in place!
 
It's not very obvious in the above picture due to the angle, but here you can see that the joists are not attached to the post at the same height. We believe this is due to the cement floor being very uneven. (Also visible in this picture is the jack that was in place temporarily while during the process. 

The last thing we did was add three additional posts under the original “beam” that was under the back wall. This combined with the support board will take care of that part of the house. We could have easily raised a beam there as well which would have had less posts or jacks littering the basement, but we felt it was a reasonable tradeoff as this was quicker and cheaper, and a beam can always be added in the future if we find the jacks to be in our way.

Here are the jacks that we added. As you can see there are several.

On a final note, there was one jack that was in place prior to our work that was loose before and actually fell down while we were doing this work. At one time, one corner of the kitchen had been turned into a bathroom and this post was added to help support the additional weight. As it was not necessary any longer, so wasn’t a problem.

The arrow shows the leaning jack.

Bye-bye jack and angle iron. You are no longer needed.


But we can't get rid of the hole where the toilet used to be.

It was a busy weekend and things could have gone better for us, but considering that no project is ever perfect this one went pretty well.

-Amanda